
In my last post, I outlined my plan to build an ant mech as an alternate build of the 42009 Mobile Crane Mk II. The quick summary can be found below. This post is about how I arrived at version 1 of the mock-up. Actually, it is incomplete, so it should be 0.5, but I am still giving it number 1.
Ant mech project, summary

1) Build an ant mech out of set 42009 mobile crane mk II
2) Use this stablilizer technique to make the ant pose-able
3) Make a mock-up first without power functions
4) Add power functions
Go here, to learn more about the plan
Click the reference image of an ant and its body part names.
Scaling through part size
Perhaps the most important thing for any MOC is the scale. The question to answer at some point is, how big is the final result going to be and how does one determine that? There are different ways to answer it. This time, I started with determining the size of one of the parts. With that, one can calculate/guesstimate how big the entire model will be, provided one has a design or drawing to base the calculation on.
The biggest chunk and where should it go?
Remember that I eventually want some of the ant’s body parts to be powered with the power functions motor of the mobile crane set? I intend to use and copy its gearbox to select which function the motor is going to drive. That gearbox needs to go somewhere, and the most bulky place in the ant seems to be the gaster ( the ant’s rear end, see the reference image above ). The alitrunk ( the middle part ) is also a good candidate location. However, if there is a remote chance to add a walking function, the gears and mechanics will have to go in the alitrunk. The last candidate is the head, but the head is the smallest of the four main body parts. This means that putting the gearbox in the head will run the risk of making the overall design too big.
So, the gaster is the place to be for the gearbox, including the engine and the battery box. It will be quite heavy because of the battery box. However, so is the gaster to the ant, which means its body features may help take care of that. Also, perhaps the battery box can be moved to the alitrunk for better weight distribution. It might mean that the gearbox needs to be mirrored, but I am not going to worry about that yet. Who knows, I might never even get to the point where it will matter.
Building the gaster
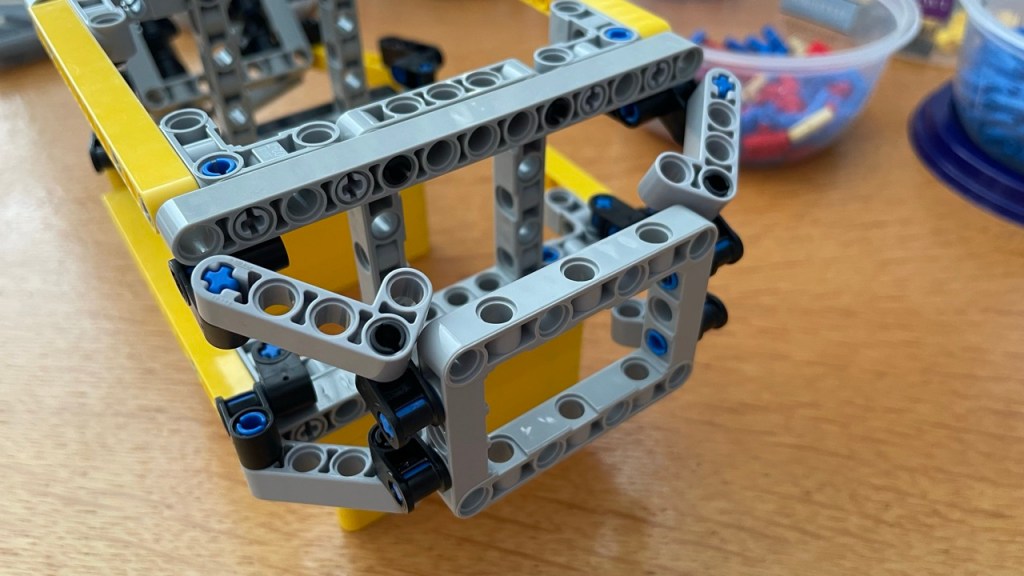
With the mobile crane manual in hand, the size of the gearbox can be determined. With that, I built this box.

I can not remember exactly what I did, but I believe ( and hope! ) that the space within the frames and corner connectors is the space needed.
Click the image to view a large image. This works for all images in this post.
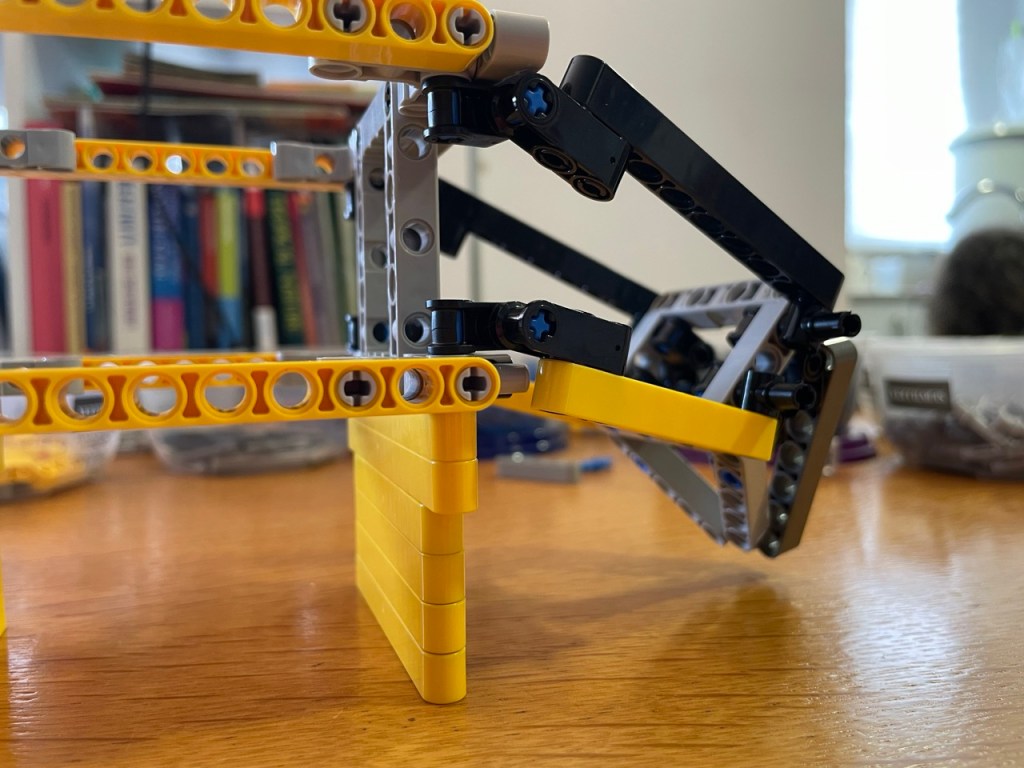
Next, the box needed additional shaping to make it look like the quite curvy gaster. Keep in mind that the reference image seems to show a dead ant: it is somewhat curled up. In most other images, the gaster bends far less down towards the stinger. This is what I came up with.

There are no suitable curved panes in the mobile crane set, and only a few angled bars. So, I had to event a somewhat cumbersome technique to approximate the curves with straight bars. For that hinges were needed that could hinge in two directions. With the parts of the mobile crane, I saw only one option, which is to use two perpendicular axle-pin connectors ( like this one and this one ). They work great for shaping because they give a lot of flexibility, but the joints costly and are not very strong. Fortunately, they are strong enough for making the mock-up. And if their weakness becomes a problem, I will solve it when that happens.
Declaring it good enough for the time being
I am not yet happy with the overall shape. It still is or feels quite straight and boxy, rather than curvy and droplet shaped. However, I feel confident that the technique I used works well enough and adding more shape will be like adding more of the same. In other words, I can postpone until later.
There is another reason to postpone finishing up, which is that this is still version one. Probably, there will be improved versions later on. Finishing up the entire thing in this early stage will mean, more work to do on the next version, which probably is not going to be the last one either.
What holds for finishing up also holds for refactoring: rebuilding or improving the design in a more efficient way. This can take a significant amount of time. Especially when it concerns parts that are deepest within the model. In such cases, the entire structure needs to be opened up, to for example replace a bar with a slightly longer or shorter one. Better postpone this until later, when either one knows that no more new versions or mayor improvements are pending, or when parts shortage requires it.
The rule of three versions
How many versions will there be? In my experience, there is a ‘rule of three’ at work. Assuming that a next version is substantially different from its predecessor, then there are three versions of each main part, and three version of each sub part of those main parts. Depending on the size of the model, there may also be sub sub parts, and so on. It is just a rule of thumb. After all, not all next versions are equally substantially different ( are you still following me? ), and where one part starts and the other ends is also not always that clear. But in any case, there will be quite a number of new versions. So, better not get too attached to a new version, because it may not be the last.
Determining the full size
In the image of the entire gaster in the previous section, there are two connected bars in the foreground. That will be the reference stick for this project. It represents the length of the gaster, which is about 28 studs. Comparing it with the reference image of the ant, it means that the total length of the ant’s body will be about three times 28 studs, or 84 studs. After all, the alitrunk is about as long as the gaster, the head is somewhat smaller, but the petiole makes up for that difference. The length of 84 studs will just be an approximation. If an extra stud or two are needed, I will add them, to each main part. And if at some point it seems better to make a part one or two studs shorter, I will do that too. So, the total might be 10 studs, or let’s say 10 percent, bigger or smaller.
With the scale of the model set, the other body parts now have their rough size constraints.
The alitrunk
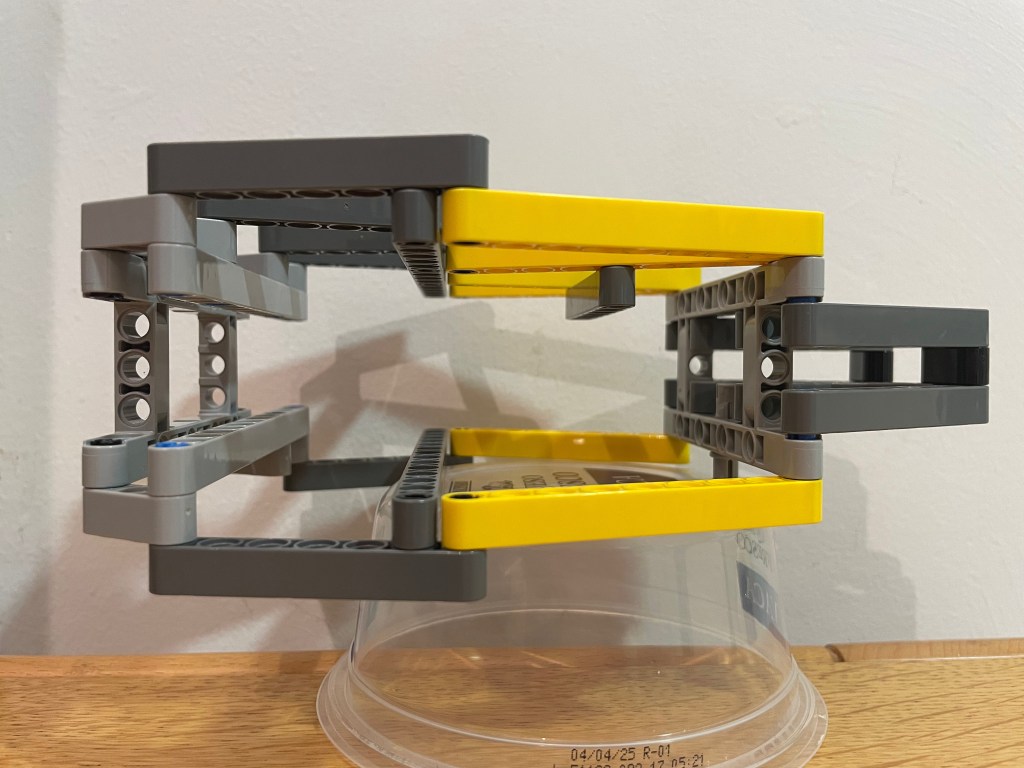
Next up was the alitrunk. I tried to keep it simple. In fact too simple:

One important feature of the alitrunk is that it has to have structural integrity, more than the other parts. Structural integrity is a fancy word for saying that something needs to be strong enough for the purpose that it serves. The alitrunk needs to be really strong because the legs attach to it, so it has to ‘carry’ not only itself, but also the gaster and the head. Strong here not only means that it should not break, but it should not bend either, and it should torque resistant. That is, it should resist attempts to twist the two ends in opposite directions, otherwise the head and the gaster will swagger.
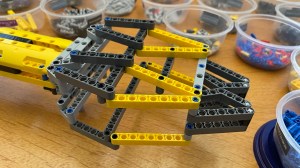
Initially, I tried to build the alitrunk with long bars. They are relatively strong, but they do bend, and they are not very torque resistant. In order to create the structural integrity needed, I used quite a few of the 5 x 7 frames and the only two 5 x 11 frames in the set. That were too many, because I already used three frames in the gaster, and the head would need some too.
Looking for alternatives, my eye feel on the panels, in particular the 11 x 3 curved panels. It is not for nothing that they are the backbone of the mobile crane’s impressive extendable boom. Compared to the bars, they hardly budge. Unfortunately, they exist only in yellow in the 42009 set, which is not a very anty color. So be it. And it is only version 1. So, the alitrunk became a long rectangular tube, only one stud shorter than the reference stick.
Airlocks and modules
Besides that it is incredibly strong, the alitrunk had another feature that I liked a lot: the 5 x 7 frames at both ends. The front end of the gaster has a frame because it provided an easy way to attach all four diagonal bars to one spot. With the alitrunk they provide solid ends to the tube, and at some point, it clicked. Those frames are excellent connectors between the main body parts, like airlocks in space stations. With just a few pins they can quickly connect to assemble the whole ant. And with a few pins more, those connections become very strong. Moreover, if and when mechanisms are introduced, the frames form good references to position axles on either side of the airlock in order to make sure that they will neatly align.
Modular building is always a good idea for designing bigger models. It is not just because they will be easier to build when the design is finished. It is also easier for the tinkering, trying out and versioning during the design process. If one is working one part, say the head, it is simply very practical if one then only has to work with the head, and not with the whole model. A no-brainer, but I had not really thought about it until I saw it happening in my hands.
I looked with my brain instead of my eyes
When I made it, I completely did not realize that the alitrunk that I made, does not even remotely look like the alitrunk in the reference image. I merely had in my mind that the alitrunk is a lot thinner than the gaster and the head, and I focused exclusively on ‘strong’. Also, from my time in Costa Rica, I knew that there are indeed ants with a really thin body. In particular the widely feared bullet ant.
Another big problem with this design is that there is very little space inside. Too little probably for any mechanism that makes the ant walk. Again, I thought, so be it. At least it is strong, and it has nice airlocks for the gaster and the head.
The head
The head has in common with the gaster that it has a lot of curves. However, whereas the gaster has the basic shape of a sausage with one pointed and one blunt end, the head has more of puck shape. Considering the two forward pointing mandibles, it almost resembles the Millennium Falcon from Star Wars. This means that the curves on the head are easier to approximate. Also, I wanted to try something else than the double hinges that I used on the gaster.
The idea was to approximate vertical curves by raising or lowering bars one or two levels, similar to how one would do this with regular straight bricks or plates. Horizontal curves would be approximated with triangular shapes of different sizes and angles.
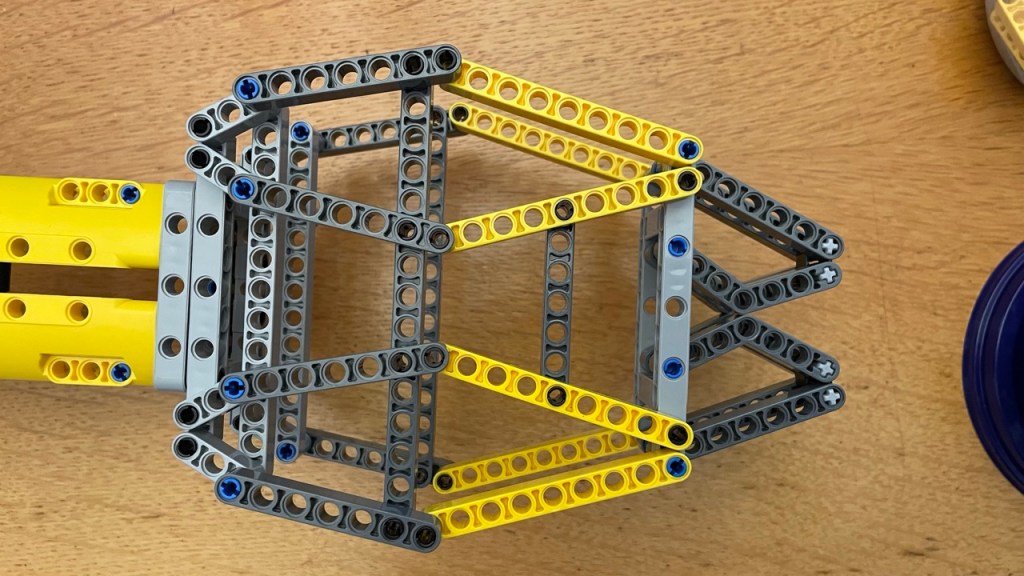
The triangles and diagonals give the head a lot of structural integrity in the plane in which they exist, here that is horizontally. The rest of the stiffness comes from the integration with two 7 x 11 frames.
At the back end, the head also has a frame, so it too can connect easily to the alitrunk.
The picture with the head seen from above, shows the mandibles closed. They can also be open.

Downsides and improvements
The head still feels a bit blocky because its sides are flat or rectangular. It also lacks eyes and antlers. Those details will have to be added in a later version.
One downside of this design is that holes of the bars are oriented vertically, which makes them less suitable as support for mechanisms inside the head. Workarounds will have to be found, if it ever comes to that.
Another downside is that the distance between the two 7 x 11 frames is most likely not a system distance, i.e. not a round number of studs. The same holds for the bars parallel to these frames. This means that any axles that will be inserted lengthwise, may not nicely fit. They may stick out a bit, or may just not reach all the way through a pin hole. Here too, workarounds will have to be and can be found.
Version 1
Putting the gaster, alitrunk and head together, delivers version one of the ant.

In my humble opinion version 1 looks more like the Battlestar Galactica under construction, rather than an ant. Obviously, important parts are missing, namely the legs, antlers and eyes. Besides that, the main body parts of v1 need more shape. For the head and the gaster, it can be done in my mind’s eye, and I am confident that that can quickly lead to the desired result. The alitrunk is a different story and the topic of the next post.
Frank van der Most, 2 November 2025
